

Summary: Take the mazes you exported as HTML, edit and order them in the Catalog Merge tool, then use Game options to publish them as a leveled game: mazes unlock one by one, the first levels can be free with the rest behind an email sign-up, and finishing the game shows a button to your book or shop. It uploads to WordPress like any catalog, or runs as a standalone HTML page.
Overview
A plain upload shows your mazes with a puzzle picker. A game keeps players longer: easy cubes first, boxes next, a four-part chain as the finale, each level unlocking the next. You build it in the desktop app, before anything goes online, in two windows:
- Catalog Merge loads one or more exported sets and lets you rename, describe, reorder and remove mazes, or mix in other puzzle types.
- Game options turns the merged set into a level path and sets what happens after each level and at the end.
The short version: in Game options, set Shell to Levels (game), check the Caption, decide on the email sign-up, export, and upload. Everything else in this tutorial is optional polish.
This tutorial assumes you can already export and upload a set. If not, start with How to Put Foldable Mazes on Your Website.

Required Modules
- Foldable Mazes in Creative + Interactive or Productivity + Interactive, for the HTML export. You can add Interactive to an edition you already own later. Catalog Merge and Game options come with Puzzle Maker Pro and work on any exported set. See Puzzle Maker Pro Editions Explained.
- For WordPress: the Puzzle Maker Pro Online plugin, installed and active. For any other web host: just the exported folder.
Preparation
Plan the levels before you generate. A game feels fair when it gets harder in steps, so make a few short runs instead of one big one, for example:
- 5 cubes, size 3 or 4, Easy: the warm-up.
- 5 cubes, size 5 or 6, Medium.
- 4 boxes, Hard, where the route climbs the tall sides.
- 2 maze chains of 3 or 4 parts as the finale.
Sixteen levels is a full session for a keen player. For a classroom slot, 6 to 8 levels is plenty.
Before the first run, untick Clear Project Folder Before Create in the main window: when it is ticked, each Create deletes the previous run. Run each step with HTML ticked in Puzzle Output Format. All runs in a project land in the project’s Puzzles → HTML folder, each with its own -catalog.json file, and those catalogs are what you load into the merge tool. How to Create Foldable Mazes covers shapes, sizes, parts and difficulty.
Step-by-Step Instructions
Open the Catalog Merge Tool
In Puzzle Maker Pro, open the Tools menu and choose Merge Puzzle JSON Catalogs. The Catalog Merge — Combine Puzzle JSON Sets window opens with an empty grid. (we’re in the process of redesigning Puzzle Maker Pro, the exact name for this menu option may change in the future).

Load Your Maze Sets
Click Import JSON… and choose the -catalog.json file of each run, one at a time, in the order you want them. Each catalog brings in its mazes in order. Duplicates are skipped, so loading the same run twice does no harm. To build a variety game, load catalogs from other puzzle types into the same grid. You can also drag and drop the json files on the grid in this window.
Each row shows the file, the puzzle type (foldable-maze), the grid, a number, the Title, the Description and the catalog it came from.
Note: you can mix different puzzle types in one catalog, the online puzzle player will find the right puzzle engine to play.
Edit Titles and Descriptions
Click a Title or Description cell and type, to set the scene: Warm-up Cube, The Tall Tower, Final Chain: Four Shapes, One Route. Your edits go into the exported game; your original files stay as they were.
Set the Collection title at the top. It is the heading of the game, for example The Fold-Up Maze Challenge.
Put the Levels in Order
Select a row and use Move Up and Move Down. The order in the grid is the level order: row 1 is Level 1. Use Remove Selected to drop a maze, and Clear to start again.
Turn On the Game
Click Game options…. The Game (level path) options window opens on the Play Settings tab.
- Set Shell to Levels (game). Menu (default) keeps the plain puzzle picker.
- Caption is the word on each level node. It starts as your Collection title, so nodes would read The Fold-Up Maze Challenge 1, 2, 3. Change it to a short word such as Level, Stage or Room.
- Lock model starts on Linear — unlock in order: each maze unlocks the next, which is what makes it a game. Open — all unlocked lets players start anywhere.
- Visible steps sets how many levels show at once (default 5;
0shows all,1only the current one). - Direction: Bottom-up (default) puts Level 1 at the bottom, like most mobile games; Top-down reads like a list.
- Show per-puzzle level titles shows your maze titles on the path. Untick it to show only the caption and number.

Decide on the Email Sign-Up
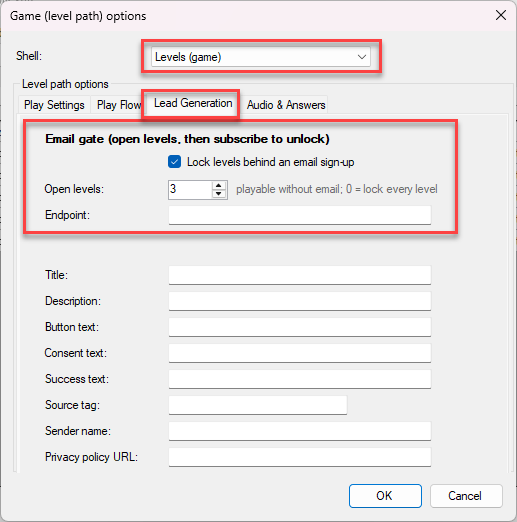
Open the Lead Generation tab. Lock levels behind an email sign-up is ticked from the start, with Open levels set to 3: players get three mazes free, then enter an email to unlock the rest.
- For a lead magnet: keep it ticked and choose how many levels are free; 3 to 5 gives players a real taste. Edit the box Title, Description and Button text so they say what the player gets, for example Unlock 13 more mazes and get the printable book sample. Consent text and Success text set the small print and the thank-you line, and a Source tag shows in your email list where a subscriber came from.
- For a classroom or a page for children: untick it, so every level is free.
On WordPress, leave Endpoint blank and set up delivery before you publish: Puzzle Catalogs → Settings → Email gate — subscribe delivery, then choose MailerLite (built-in) or Webhook — any provider (Zapier, Make, n8n, or a custom endpoint). The sign-up box unlocks levels only once delivery is set up, so untick the gate if you are not ready. On a standalone HTML page, enter your own Endpoint, or untick the gate; Host Your Puzzles as a Standalone HTML Page explains it.
Set What Happens After Each Maze and at the End
Open the Play Flow tab.
On solve decides what follows a finished maze:
- Show a Next button (default): players choose when to move on, and can turn the solved shape first.
- Stay on the puzzle (banner only): no prompt to move on.
- Auto-return to the level map or Auto-advance to the next level: hands-free; Auto delay (ms) sets the pause.
Tick Auto-check: detect a solve without pressing Verify. With it ticked, a finished route clears the level straight away; without it, players press the player’s Check button to clear it.
Under Completion panel (shown when all solved), replace the starter Message and Button text with your own, for example You beat every maze! and Get the printable book, and put an https link in Button URL, such as your product page.
Leave Collection ID blank on a new game. The tool creates one when you export, and players’ progress is saved in their browser under that ID. Regenerate gives everyone a fresh start, so use it only when you mean to.
Click OK.
Export the Game
Back in the merge window:
- Include index.html (web player bootstrap) starts ticked. Keep it: WordPress ignores the file, and it lets the same export run as a standalone page.
- Display Credits shows or hides the “Created with Puzzle Maker Pro” line.
Click Export Set…, choose an empty folder and name the set, for example fold-up-maze-challenge. The tool writes the edited mazes, an assets/ folder for any images, a fold-up-maze-challenge-catalog.json with your game settings inside, index.html, and fold-up-maze-challenge-wordpress.zip. A summary confirms what it wrote. Keep this folder: it is your game’s master copy.
Publish It
On WordPress: go to Puzzle Catalogs → Add New, drop the -wordpress.zip on Catalog Upload, publish, then copy the shortcode from the Shortcode column, such as , into any page. A game that mixes puzzle types is filed under Mixed, with each type as a tag. The upload steps are the same as in How to Put Foldable Mazes on Your Website.
Without WordPress: upload the whole exported folder to your web host and open its index.html at its web address, as shown in Host Your Puzzles as a Standalone HTML Page.
Then play it once from start to finish: check the level names, the free levels, one real sign-up, and the button at the end.
Change the Game Later
Open the merge tool and import the -catalog.json from your exported game folder: that brings back your mazes, their titles and order, the game settings and the Collection ID. Check the Collection title and retype it if it changed. Add, rename or reorder mazes, export again into the same folder with the same set name (the tool asks before it overwrites), and upload the new zip to the same Puzzle Catalog post. Because the Collection ID is the same, players keep their progress.
Starting again from the original run catalogs creates a new Collection ID instead, and players start over.
Outcome
Your foldable mazes now play as a real game: titled levels in your chosen order, unlocking one by one, with free levels up front, an optional email sign-up, and a finish button that sends players where you want them. The printable nets from the same runs still make the book, so one set of mazes serves the shelf and the website.
FAQ
Can I change the maze itself in the merge tool?
The merge tool edits titles, descriptions, order and game settings. To change a maze’s shape, size or difficulty, create it again in Foldable Mazes with HTML ticked and import the new catalog.
Can I mix foldable mazes with other puzzles in one game?
Yes. Import any exported Puzzle Maker Pro catalogs into the same grid and order them as you like. In WordPress, a mixed game is filed under Mixed, with each puzzle type as a tag.
Do players lose their progress when I update the game?
Not if you import the exported game’s own -catalog.json before you change it, so the Collection ID stays the same. Progress is saved in each player’s browser under that ID.
Which On solve setting suits foldable mazes?
Show a Next button: a player often wants to turn the solved shape and admire the route before moving on. Use Auto-advance for quick, arcade-style sets of small cubes.
Where do email sign-ups go?
On WordPress, to the MailerLite account or webhook you set under Puzzle Catalogs → Settings → Email gate — subscribe delivery. Set it up before you publish a gated game. On a standalone page, they go to the Endpoint address you entered on the Lead Generation tab.