Creating Your First Magnet Logic Puzzle
Once you understand how Magnet Logic puzzles work, the next step is to generate your own.
This tutorial will guide you through every stage—from defining grid size to previewing the final puzzle and its automatically generated solution.
You’ll also learn how content options, styles, and difficulty levels influence the appearance and logic of your puzzles.
1 | Overview
Every puzzle you create with Puzzle Maker Pro – Magnet Logic follows the same internal logic:
- The grid is divided into 1 × 2 rectangles called magnets.
- Each magnet has one positive and one negative half.
- Some rectangles can remain neutral.
- The generator guarantees a single unique solution and automatically calculates the row and column clue numbers visible along the grid’s edges.
Your job as the creator is simply to define size, difficulty, content, and visual style.

2 | Setting Up a New Puzzle
- Open Puzzle Maker Pro – Magnet Logic.
- Select or create a Preset from the drop-down at the top left.
Presets store your preferred layout and style for future projects. - Under Quantity, choose how many puzzles you want to generate.
For testing, keep it at 1. - Make sure Difficulty is set to Easy for your first run.
- Enter a Height and Width that form an even number of total cells—
for example 5 × 6 = 30 cells (valid).
The software will automatically reject impossible odd totals such as 5 × 5.
When you’re done, click Create or Next Preview to generate your first puzzle.
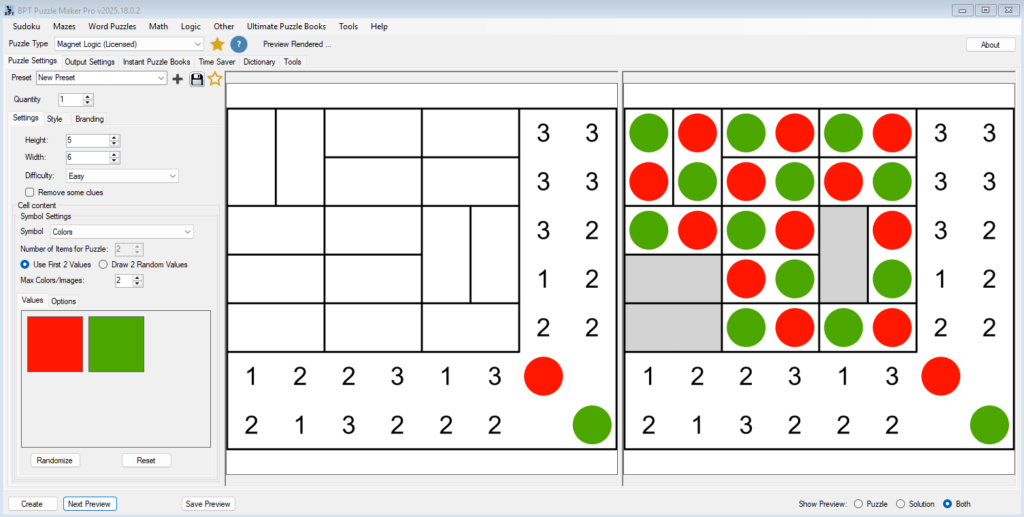
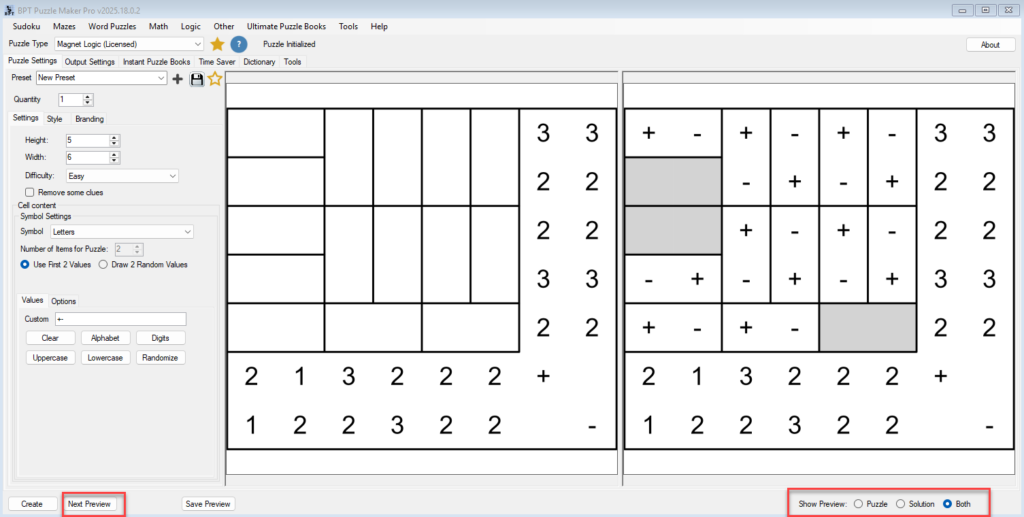
You’ll immediately see two panels:
- Left panel: the puzzle that your audience will solve.
- Right panel: the complete, correct solution including polarity marks and neutral rectangles.
3 | Adjusting Grid Dimensions
Grid size controls both visual proportion and logical complexity.
| Example | Cells | Character |
|---|---|---|
| 4 × 6 | 24 | Quick, compact puzzles suitable for classroom worksheets |
| 5 × 6 | 30 | Balanced puzzles for beginner books |
| 6 × 8 | 48 | Magazine-level challenge |
Tip: larger grids exponentially increase the number of possible placements.
If you want manageable generation times and clear print layouts, stay below 8 × 10 for most publications.
4 | Choosing Content (Symbols, Letters, or Images)
The Cell Content area defines how magnet halves are displayed.
This changes only the appearance—the underlying logic always stays magnetic.
Options
- Polarity (+/−) – Classic presentation.
- Letters – Use A/B, vowels/consonants, or your own letter pairs.
- Numbers – For math-themed books.
- Colors – Great for children’s puzzles.
- Images – Icons such as cats/dogs or sun/moon for thematic sets.
To select:
- Open Symbol Settings → Symbol and choose a type.
- Define the Number of Items for Puzzle (normally 2 for +/− pairs).
- Choose Use First 2 Values for consistent pairs or Draw 2 Random Values for variety.
Custom Values
Under Values → Custom, you can enter your own pair or upload icons.
For example:Cat and Dog, or two simple emoji images.
The software will display them in place of + and − in both puzzle and solution previews.
5 | Difficulty and Clues
The Difficulty setting determines how many clues and givens are included.
| Setting | Description |
|---|---|
| Easy | Most or all row/column indicators visible, suitable for education |
| Medium | Fewer clues, introduces neutral rectangles |
| Hard | Sparse clues, logical chains required |
| Expert | Minimal clues, still guaranteed unique solution |
When you select a level, the generator automatically adjusts clue density and neutral frequency.
You can optionally tick Remove Some Clues for added variety in bulk generations.
6 | Styling and Layout
Click the Style tab to refine visual presentation.
Borders
- Region Border: outlines each 1 × 2 magnet.
- Cell Border: divides each magnet into its two halves. Default 0 (no line).
- Puzzle Border: frames the entire grid.
Increasing line weight enhances clarity, especially for print.
Fonts & Colors
You can modify:
- Font size and family (for letters or symbols)
- Foreground/background colors
- Region fill color for magnets
- Neutral cell color (light gray is standard)
Sketch Lines
Activate sketch lines to produce a hand-drawn appearance, ideal for informal or kids’ puzzle books.

7 | Previewing Puzzles and Solutions
Use the Show Preview radio buttons at the bottom right to switch between:
- Puzzle
- Solution
- Both
The puzzle view hides the internal polarity; the solution view shows every + and − plus any grey neutral rectangles.
You can refresh endlessly with Next Preview until you’re satisfied with the generated combination.
8 | Exporting Your Work
When you’ve finalized the look:
- Open the Output Settings or Instant Puzzle Books tab.
- Choose your preferred image format:
- PNG / JPG – for direct print or inclusion in instant puzzle books.
- Transparent PNG – for compositing on colored backgrounds.
- SVG for vector based output
- Choose your Instant Puzzle Book output format, if needed:
- PDF – ready for book interiors or worksheets.
- Powerpoint – easily editable format
- Set the desired resolution (up to 300 DPI).
When you click Create, you will get both the puzzles, solutions and the puzzle books fully aligned and print-ready.
9 | Saving and Reusing Presets
After fine-tuning your favorite layout, click the ⭐ Save Preset button.
Presets store:
- Grid size
- Difficulty level
- Content type and values
- All style settings
Next time, select the preset to reproduce identical puzzle characteristics across a full book or series.
10 | Creative Applications
- Education: Replace +/− with letters or colors for logic-and-language lessons.
- Puzzle Books: Combine varied grid sizes and difficulties for progressive challenge.
- Thematic Collections: Use image pairs—cats/dogs, summer/winter, hero/villain—for niche editions.
- Seasonal Printables: Pair bright colors with sketch lines for festive classroom activities.
No matter the presentation, each puzzle retains the same mechanical core and unique solution structure.
11 | Best Practices
- Keep grids even: ensures complete magnet coverage.
- Preview before export: verify edge clues and neutral visibility.
- Balance readability and difficulty: too few clues can overwhelm beginners.
- Maintain consistent line weights across pages in a book.
- Batch-generate with presets to maintain style consistency throughout puzzle packs.
12 | Summary
| Step | Action | Result |
|---|---|---|
| 1 | Choose grid size (even cells) | Defines magnet layout |
| 2 | Pick content type (+/−, letters, images) | Controls visual theme |
| 3 | Set difficulty level | Determines clue density |
| 4 | Adjust style settings | Improves print quality |
| 5 | Generate and preview | View puzzle and solution |
| 6 | Export or batch book | Ready for education or publishing |