Time Saver for Queens Puzzles
Overview
Creating Queens puzzles one by one is fine for testing, but if you’re building a full puzzle book or need dozens of puzzles at once, it can take too long. That’s where the Time Saver comes in.
With the Time Saver (available in the Creator Edition), you can:
- Generate multiple puzzles in a single batch.
- Mix different grid sizes and difficulty levels.
- Apply saved presets for consistent styling.
- Output directly to PDFs, PPTs, or image files — ready for publishing.
This tutorial shows you how to set up and run the Time Saver to save hours of manual work.
Required Modules
- Puzzle Maker Pro – Queens (Creator Edition)
👉 Get it here »
Preparation
Before using the Time Saver:
- Create and save at least one preset with your preferred styling (fonts, region colors, titles).
- Decide how many puzzles you want and whether you’ll use different grid sizes.
- Choose your target output format: PDF, PPT, or individual images.
Step-by-Step Instructions
1. Enable Time Saver
- Go to the Time Saver tab.
- Check the box Use Time Saver to generate Puzzles.
- The setup area will open with a table for your batch configuration.

2. Add Rows for Puzzle Types
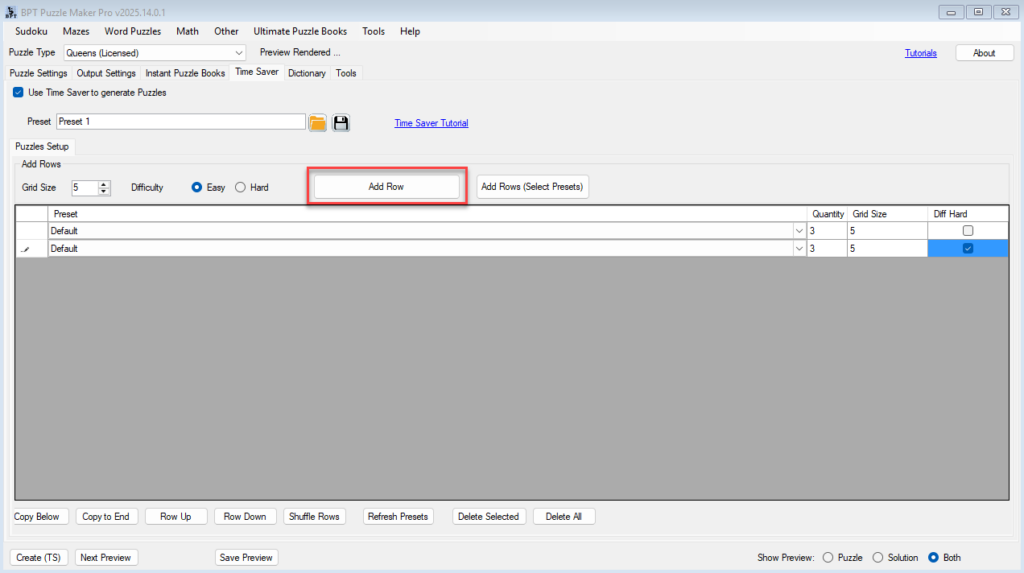
Each row in the table represents a batch of puzzles with a certain configuration.
- Select a Grid Size (5–8).
- Choose Difficulty: Easy or Hard.
- Click Add Row to insert the configuration into the table.
Example:
- 3 puzzles, grid size 5×5, Easy.
- 3 puzzles, grid size 6×6, Hard.

3. Apply Presets
- In the Preset column, select one of your saved presets (e.g., 5×5 Color Regions with Q).
- This ensures all puzzles generated with that row use the same style and branding.
- You can add multiple rows with different presets to mix styles.

4. Organize the Batch
Use the controls below the table:
- Copy Row: Duplicate a row to create variations quickly.
- Row Up / Row Down: Change the order in which puzzles are generated.
- Shuffle Rows: Randomize the order for variety.
- Delete Selected: Remove rows you don’t need.
- Refresh Presets: If you are saving presets in the Puzzle Settings, the dropdown menu in the batch table will not automatically be updated, so you’ll need to click Refresh Presets to load the newest presets in the list
5. Preview a Sample Puzzle
- Select one of the presets from your rows.
- Click Next Preview to check styling.
- Adjust in the Puzzle Settings tab if needed, then return to the Time Saver tab.
6. Generate the Full Batch
- Go to the Instant Puzzle Books tab.
- Choose output format:
- PDF (ideal for KDP publishing).
- PPT (editable layouts in PowerPoint).
- Full-page images (JPG or PNG).
- Set trim size, margins, and layout (puzzles per page).
- Return to the Time Saver tab and click Create (TS).
7. Optional Outputs (Creator Edition)
- Interactive PDFs: Players can click to place “Q” or “–”.
- HTML puzzles: Export for your website. See Interactive Puzzles Tutorial.
Outcome
By the end of this tutorial, you’ll be able to:
- Batch-generate Queens puzzles of different sizes and difficulties.
- Apply styling presets for professional, consistent branding.
- Export complete puzzle books or collections in a single step.
This dramatically reduces production time, letting you scale puzzle publishing with ease.
